[amazon_link id=”B001S1BP6I” target=”_blank” container=”” container_class=”” ]edge slicker or bone folder[/amazon_link]
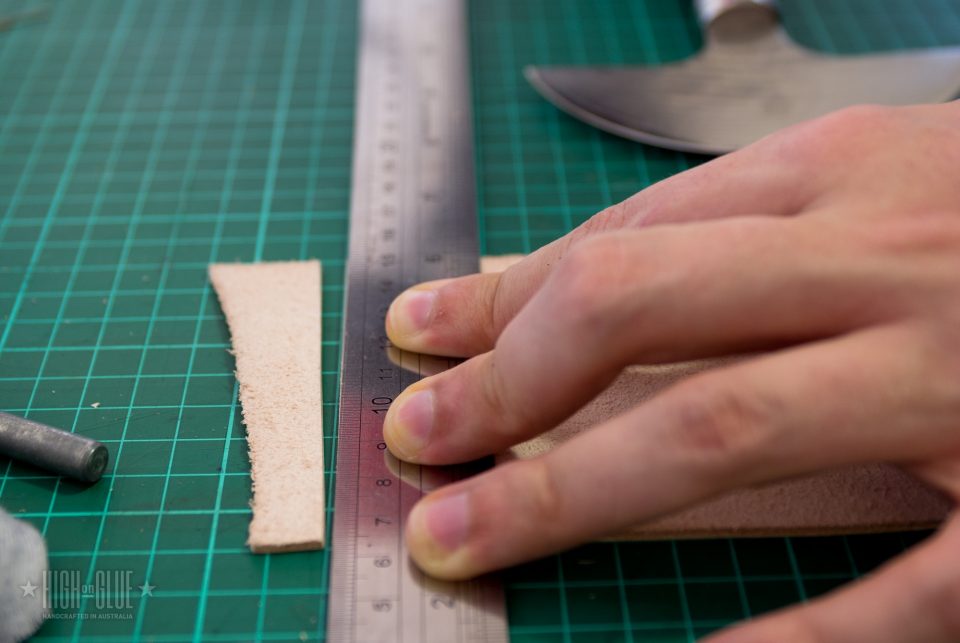
Step One: cutting the parts
You will need a total of 4 pieces of leather in 2 different thicknesses (these measurements fit iPhone 4 and iPhone 4S):
The large outside piece: 285mm by 87mm at around 2.5-3mm thickness.
The inside piece that holds the phone: 130mm by 87mm at around 2.5-3mm thickness.
The two credit card slots made from thinner leather: 97mm by 87mm and 77mm by 87mm at around 1.5mm thickness.
You can use a scalpel or a head knife for cutting. Make sure you use the sharpest tools for nice & clean cuts.
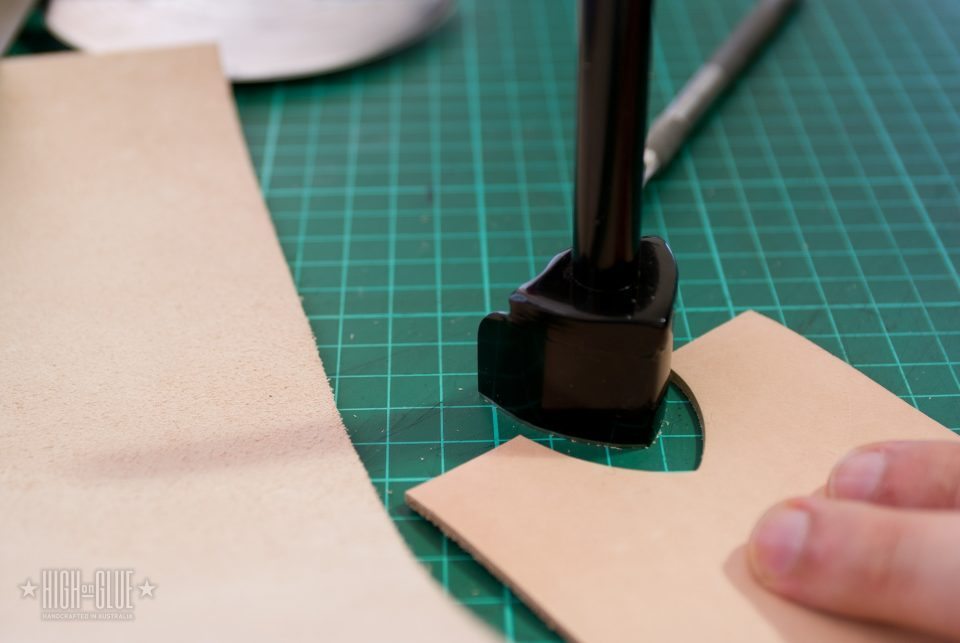
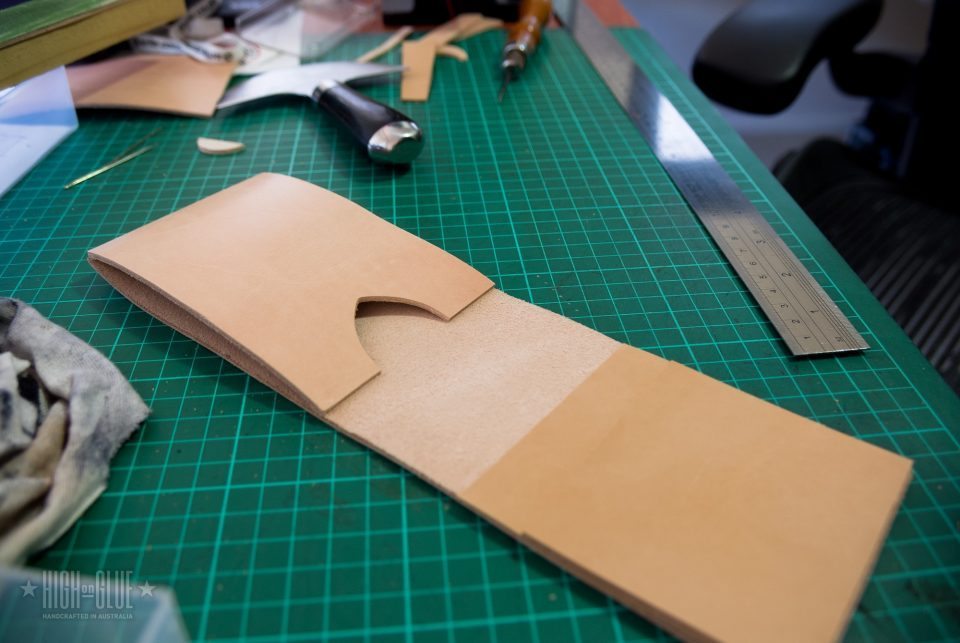
Cutout
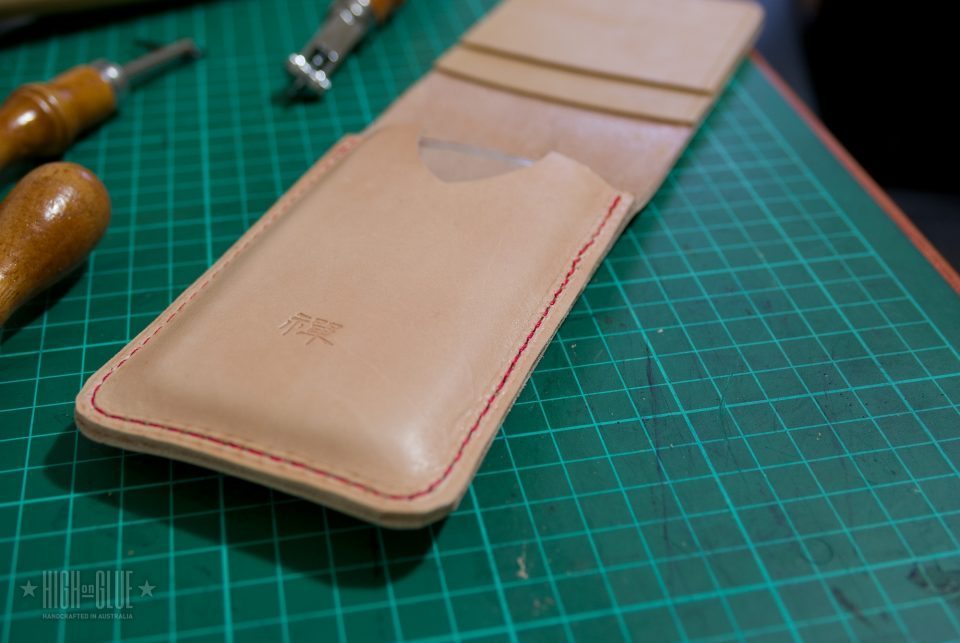
You need to cut out a part of the inside piece (the one that holds your phone in place) to allow you to take out the phone easier. I used a Strap End Punch but you can also just trace a half-circle and cut it out with a scalpel. This is what it looks like after punching out the top cutout.
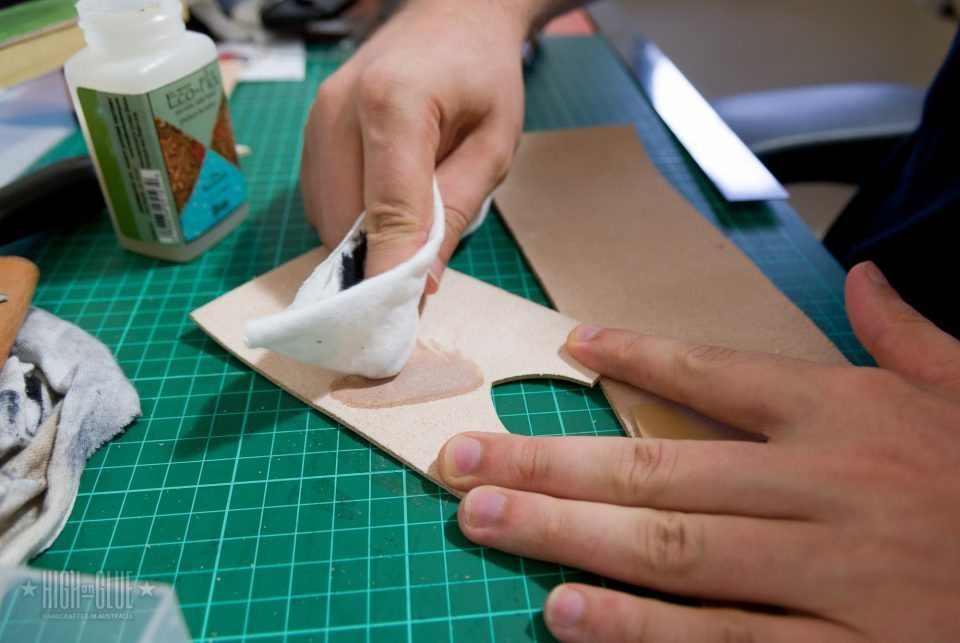
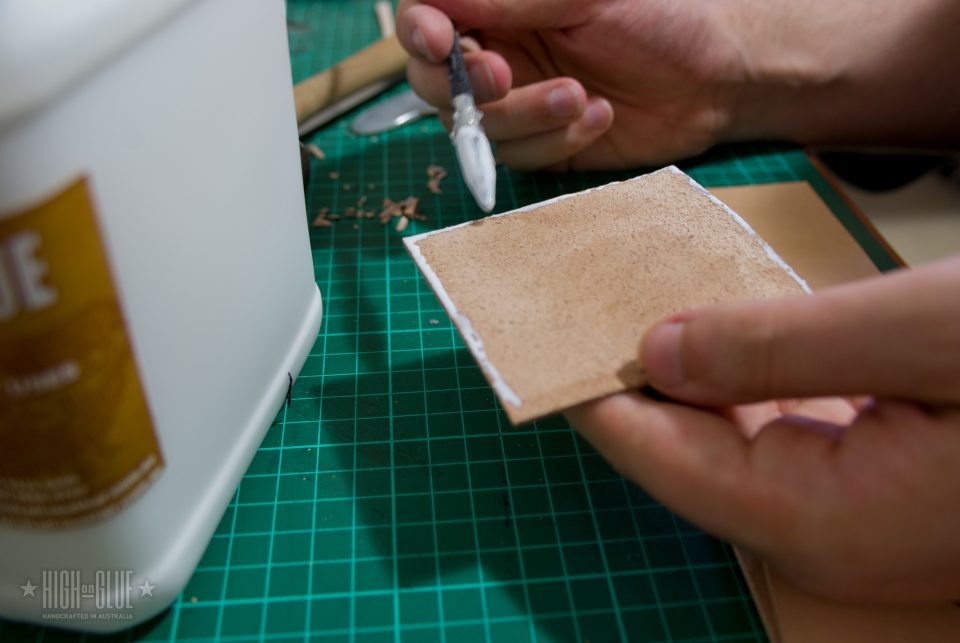
Smooth flesh side
You can use gum tragacanth to make the flesh side of the leather smoother.
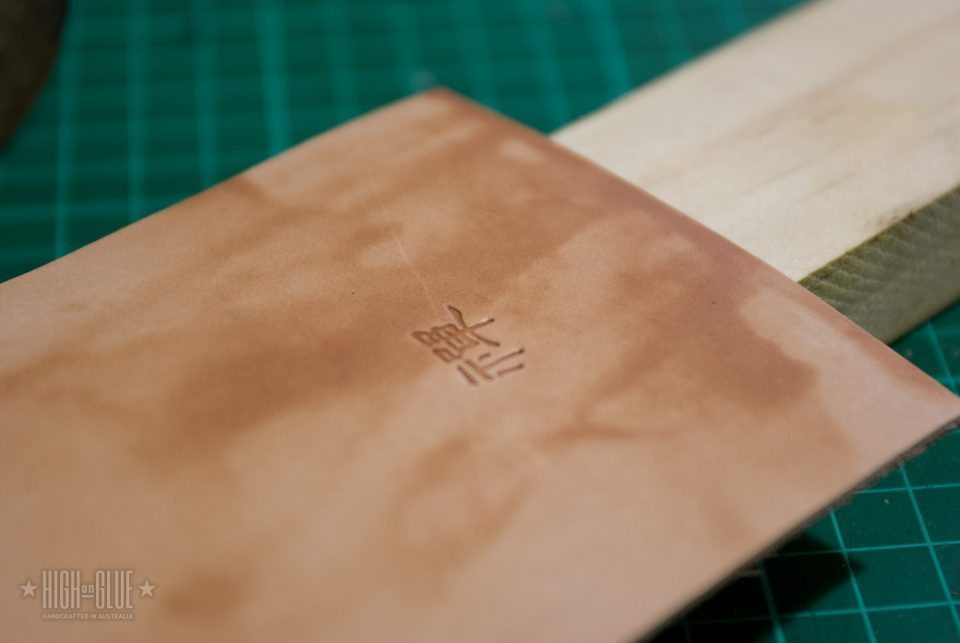
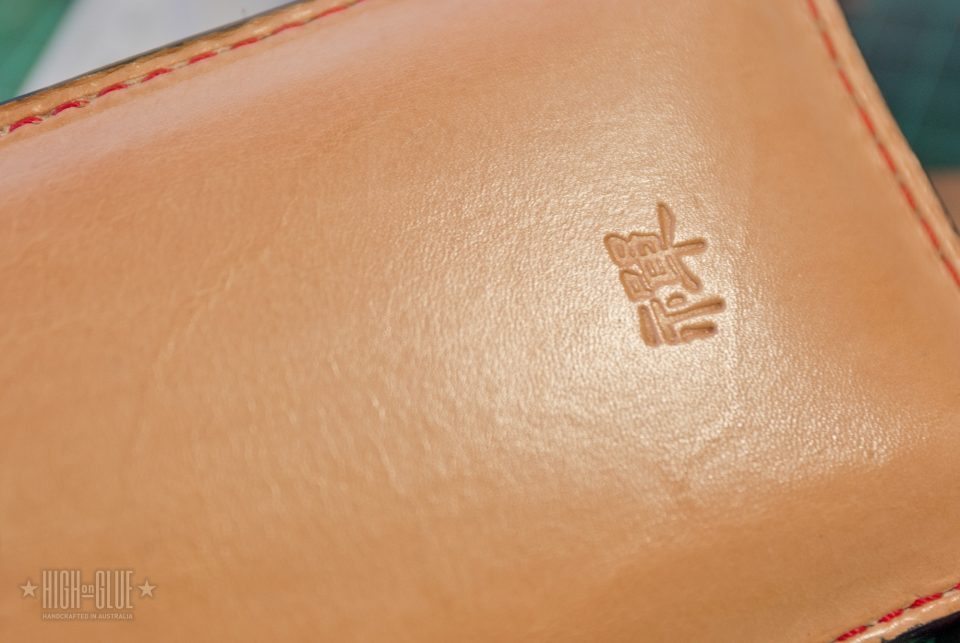
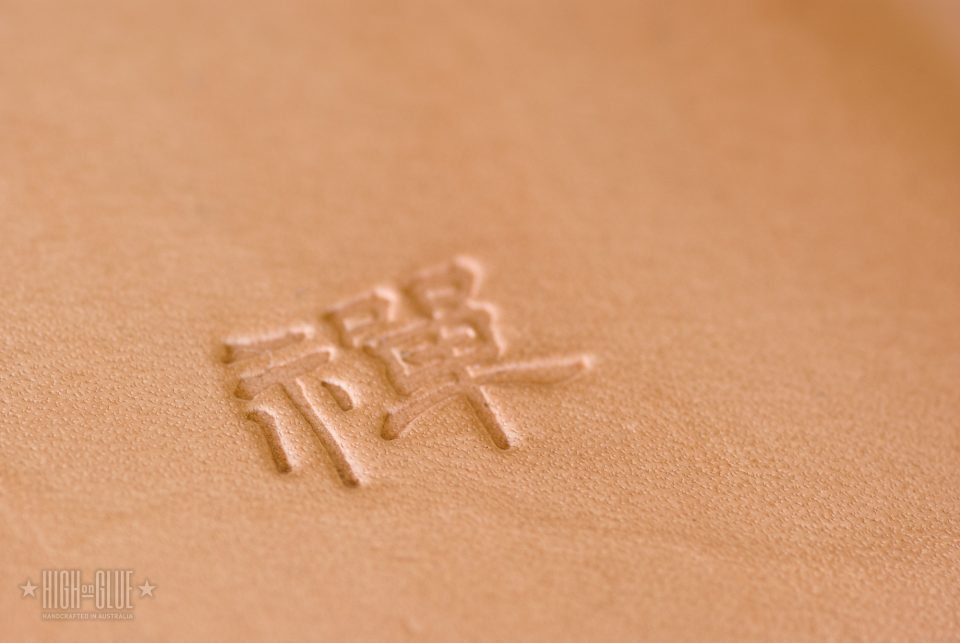
Stamping the inside piece
Moisten the leather piece to prepare it for stamping
Stamping
Once it’s almost dry you can place the stamp on the leather and give it a good whack with a heavy mallet. If your leather is too wet, the impression won’t be as crisp. Generally it’s a good idea to wait for the leather to almost return to its original colour before you stamp it.
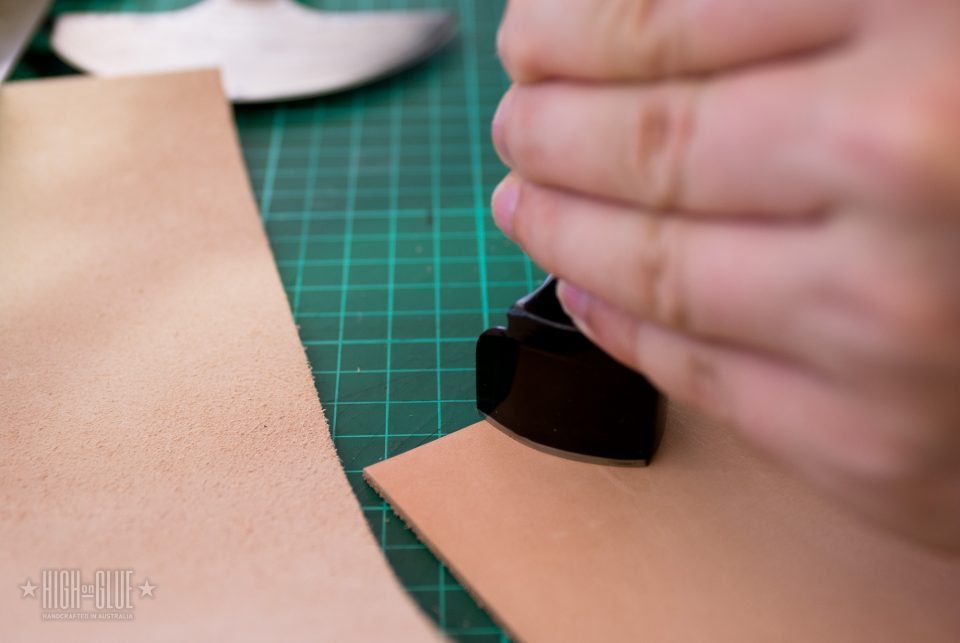
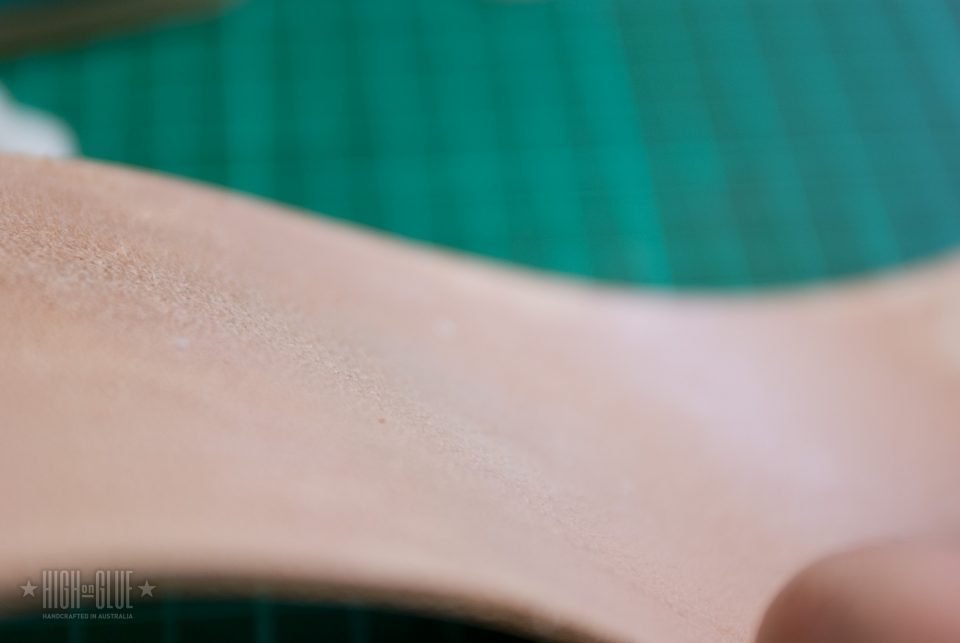
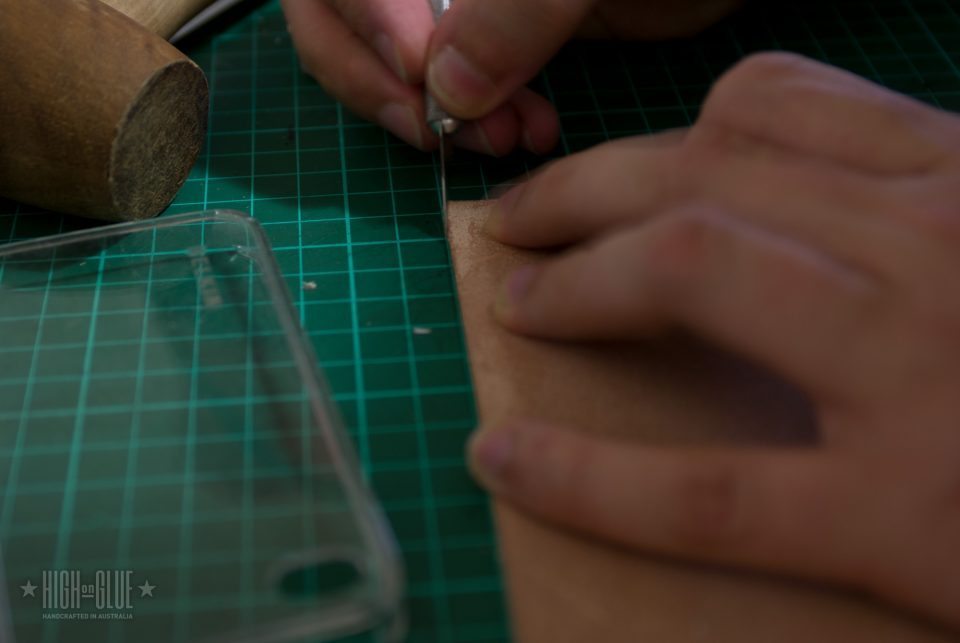
Cut rounded corners
Use a scalpel to cut a rounded corner. I used a 1cm square as reference so that’s the corner radius.
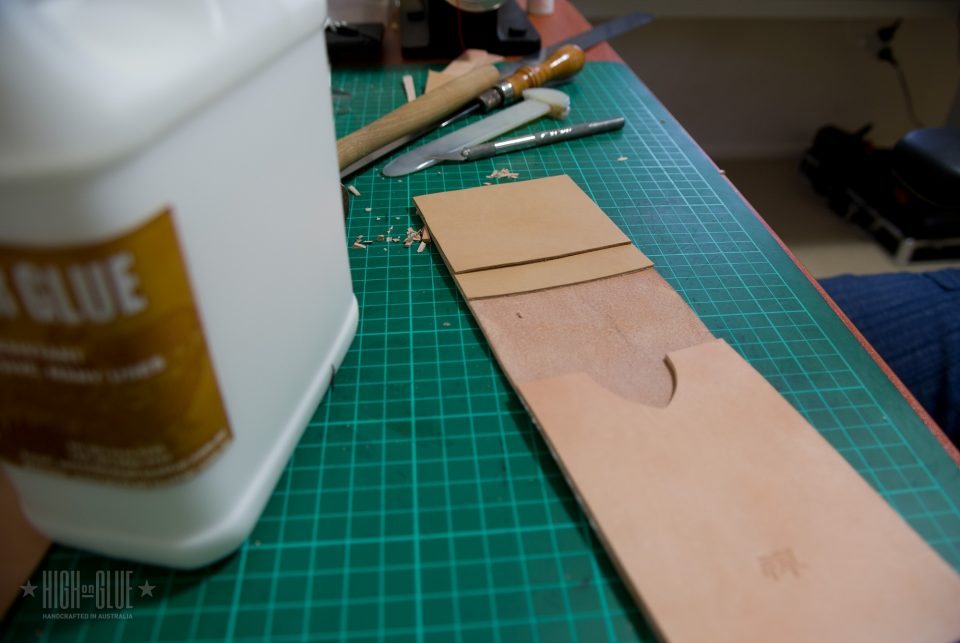
Glue parts in place
It’s a good idea to glue the parts in place before sewing. Proper alignment is very important if you want the wallet to look good.
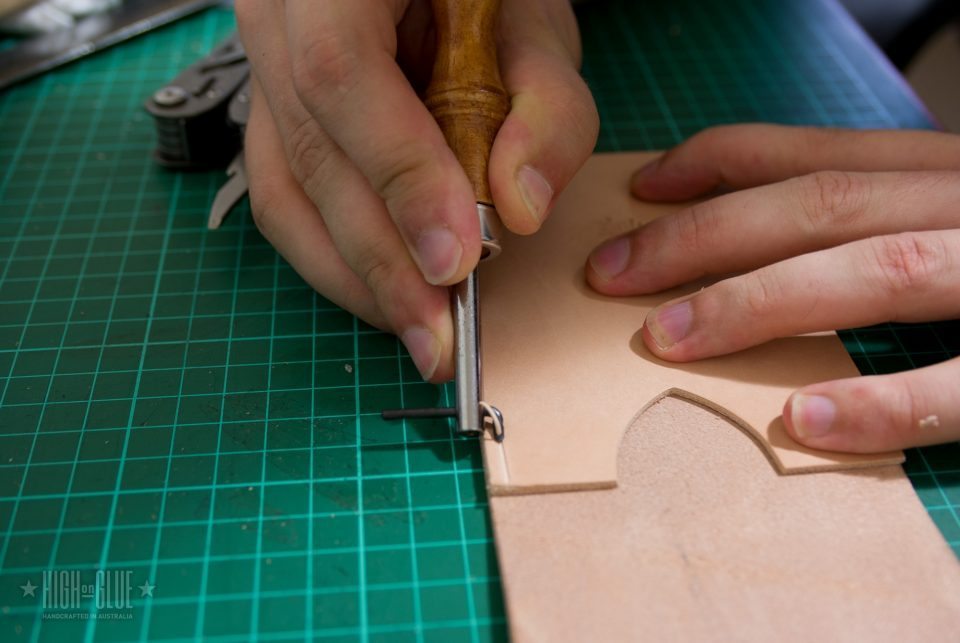
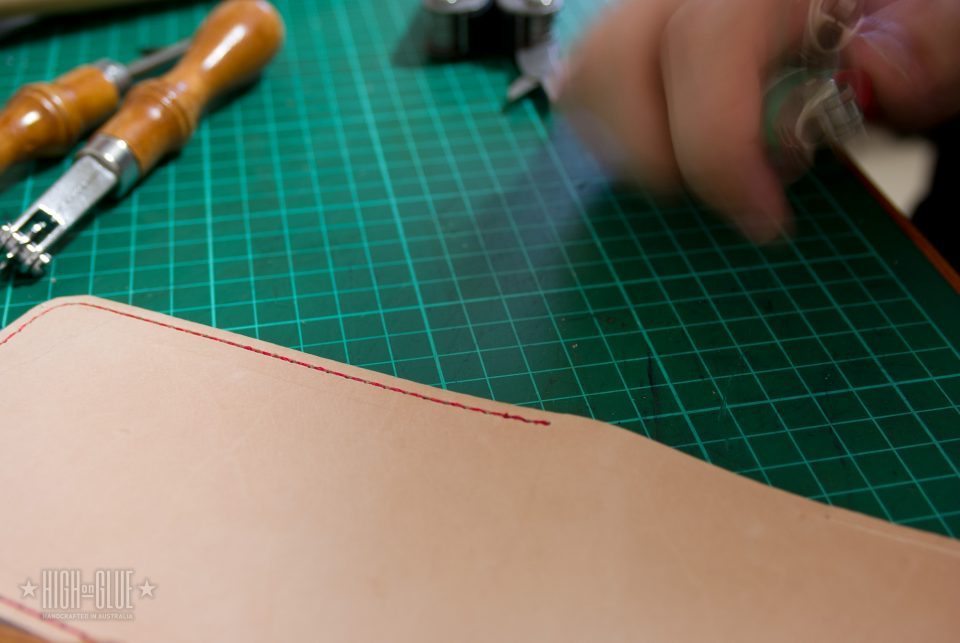
Add stitching groove
Use a stitching groover to add a grove as a guide along both sides.
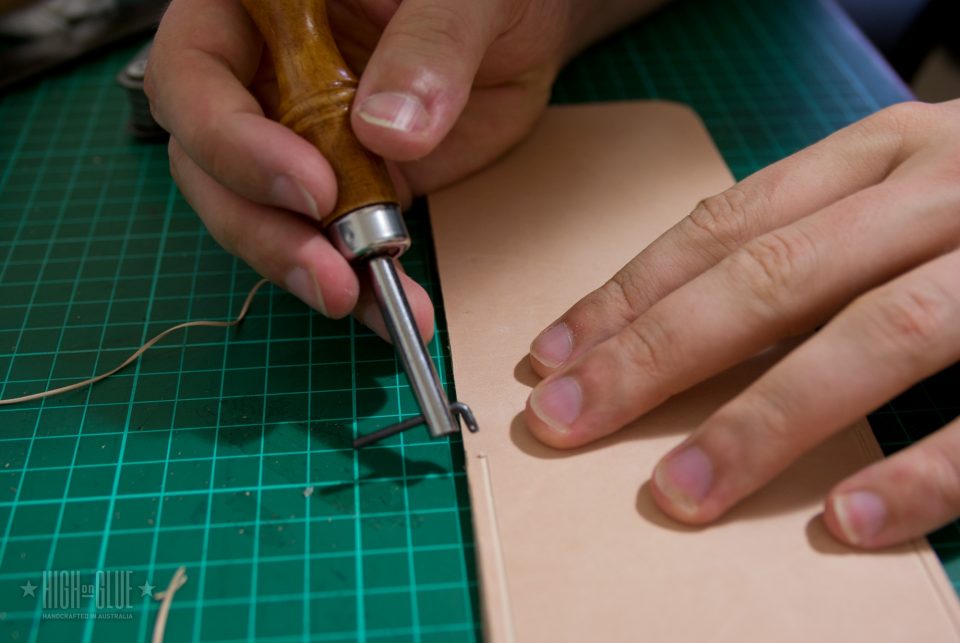
Add stitching groove
Be careful! The other side won’t need a groove all the way along the edge. You can stop where the bottom piece of leather ends on the other side.
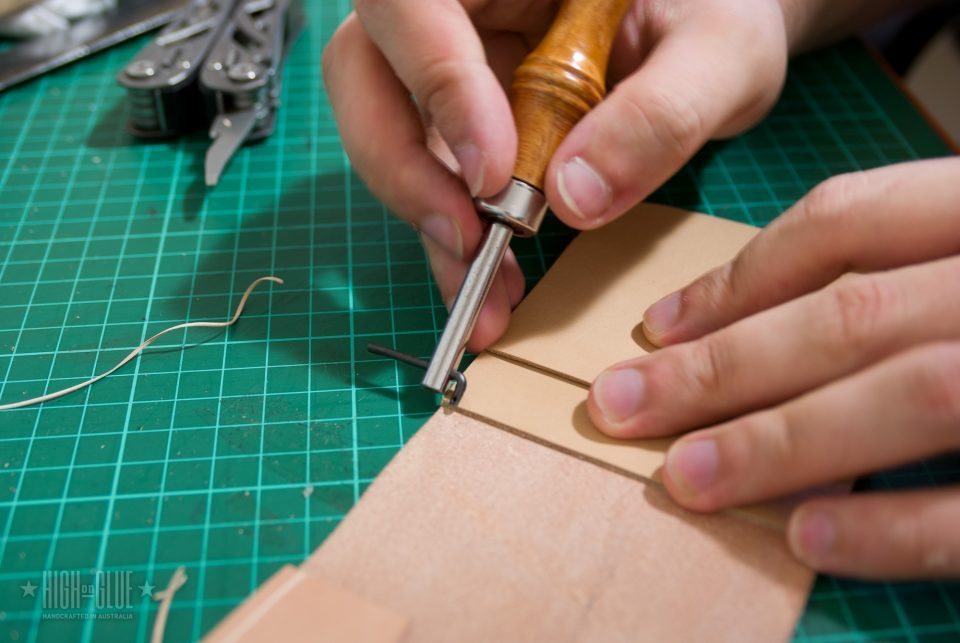
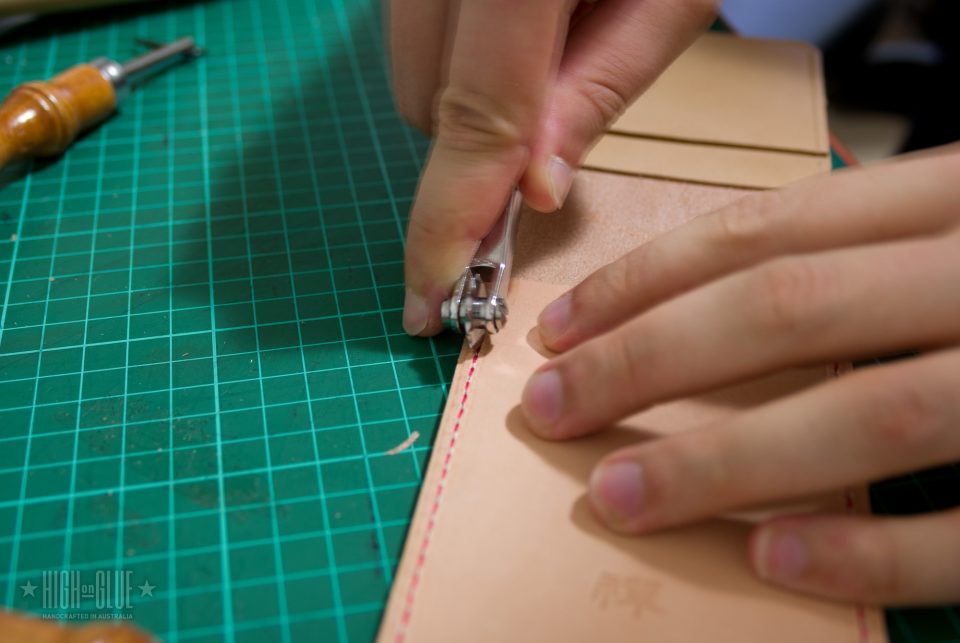
Add stitching spaces
Use an overstitch wheel on one side as a guide for your stitches. I use them as guides when hand sewing as well as machine sewing.
Sew the parts together
Once you’re done sewing (if you need instructions, check out my tutorial on this site), use a lighter to burn the ends of the thread to keep them from fraying.
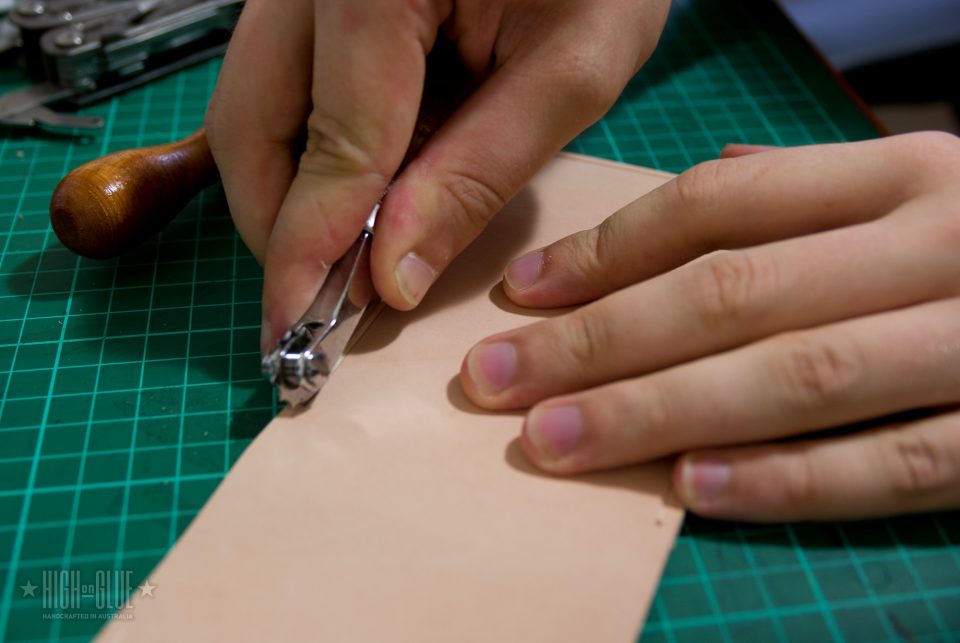
Cleaning up
Cleaning up the stitches afterwards using the same overstitch wheel helps to give the stitches a good & even appearance.
Fitting & shaping
I use a Belkin plastic iPhone case to stretch the leather into shape. I find that it works better than using the phone because I don’t have to worry about ruining it with moisture and having it slightly bigger than the phone also makes the shape more ideal (the phone will slide in and out a bit easier). You could also use the phone itself or just stretch the leather into shape with your hands.
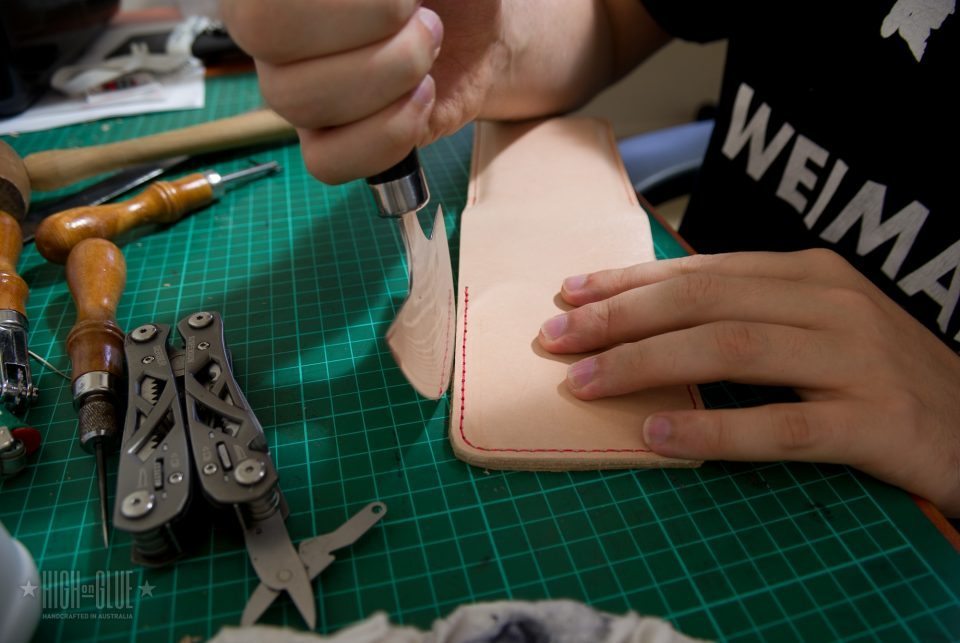
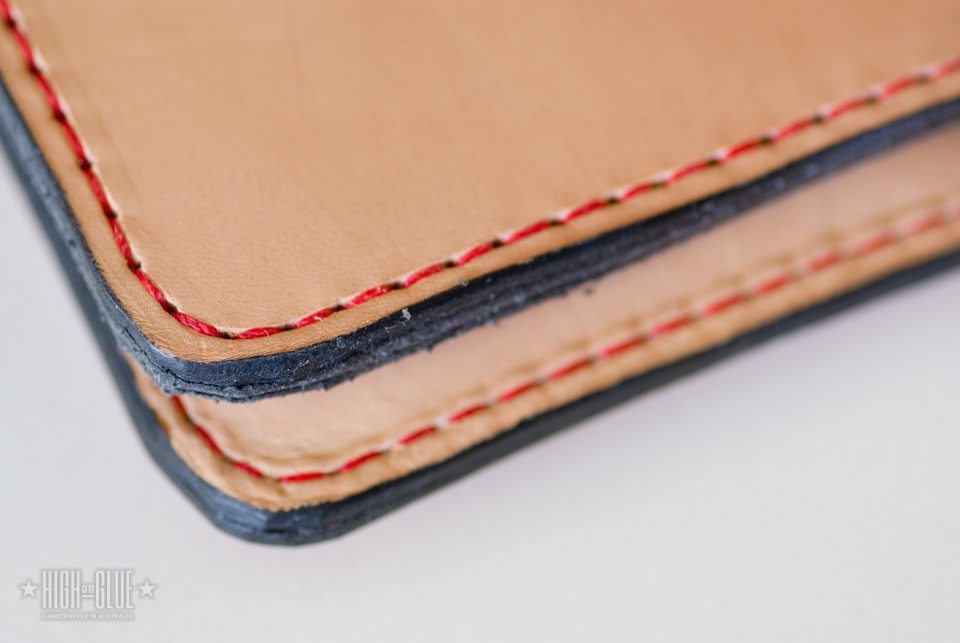
Cutting the edges
You want to have the edges align perfectly so cut or sand down the edges to make them as even as possible
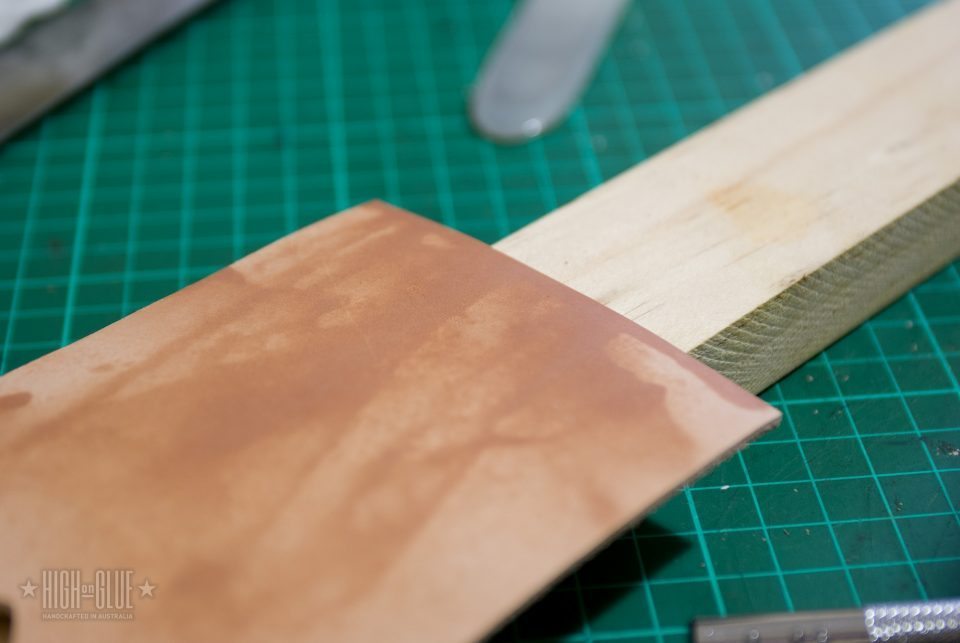
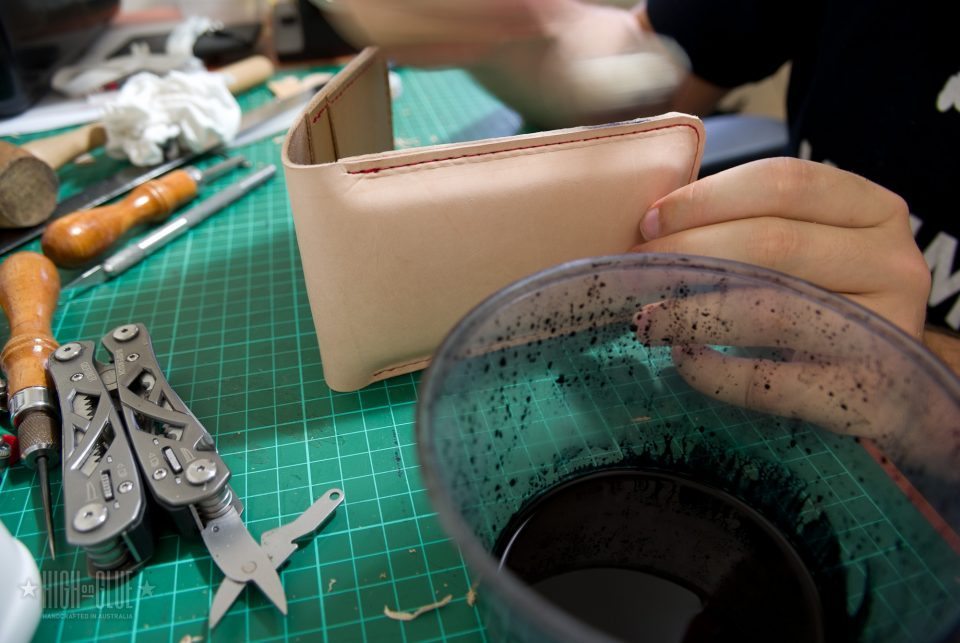
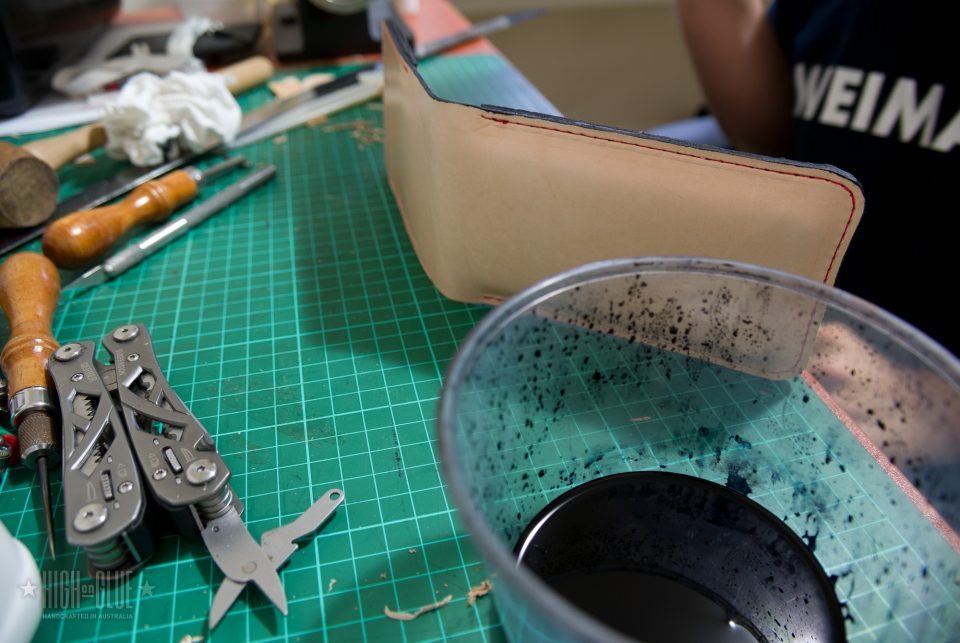
Dyeing the edges
Use a wool dauber and dark dye around the edges of the wallet
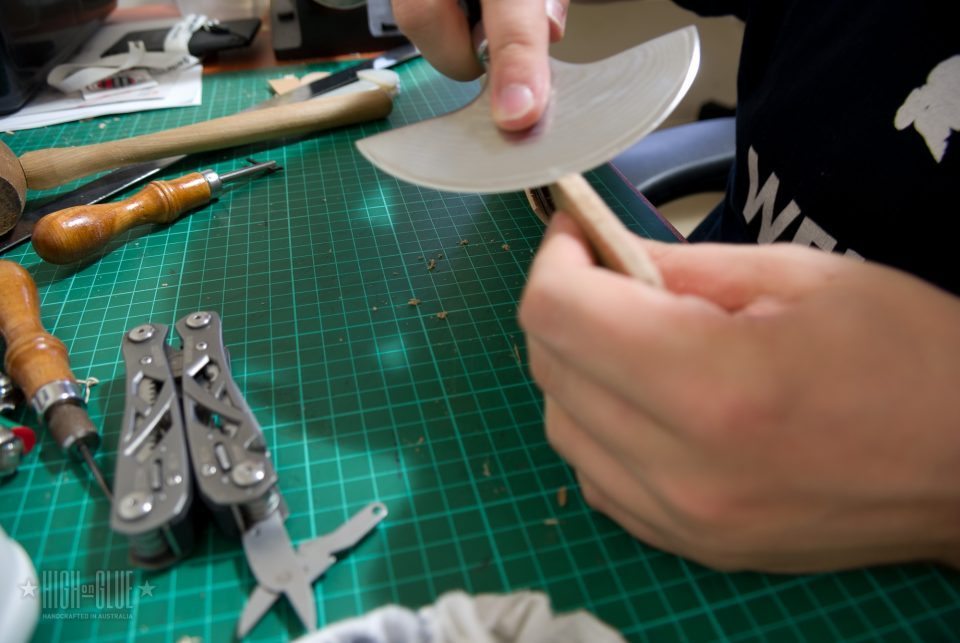
Refining the edges
Use a edge slicker or bone folder and move it back and forth along the edges to make them smooth.
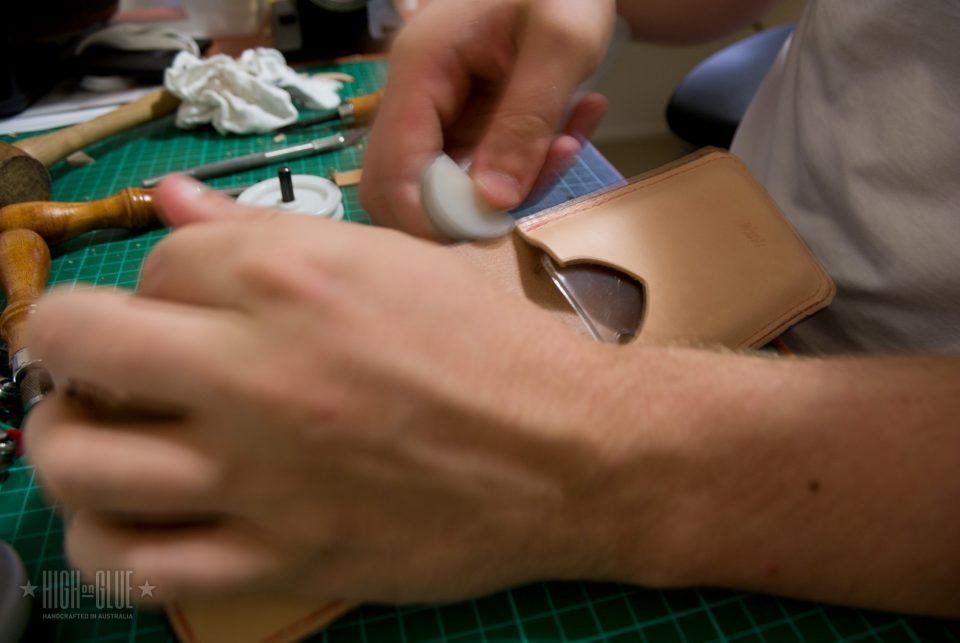
Seal & finish
Use your leather finish of choice to seal and waterproof the leather. You can use an oil or one of the other available finishing products.
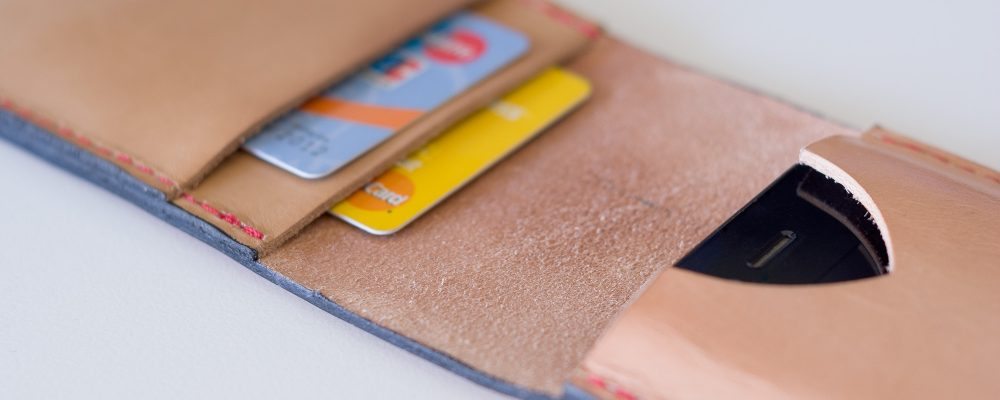
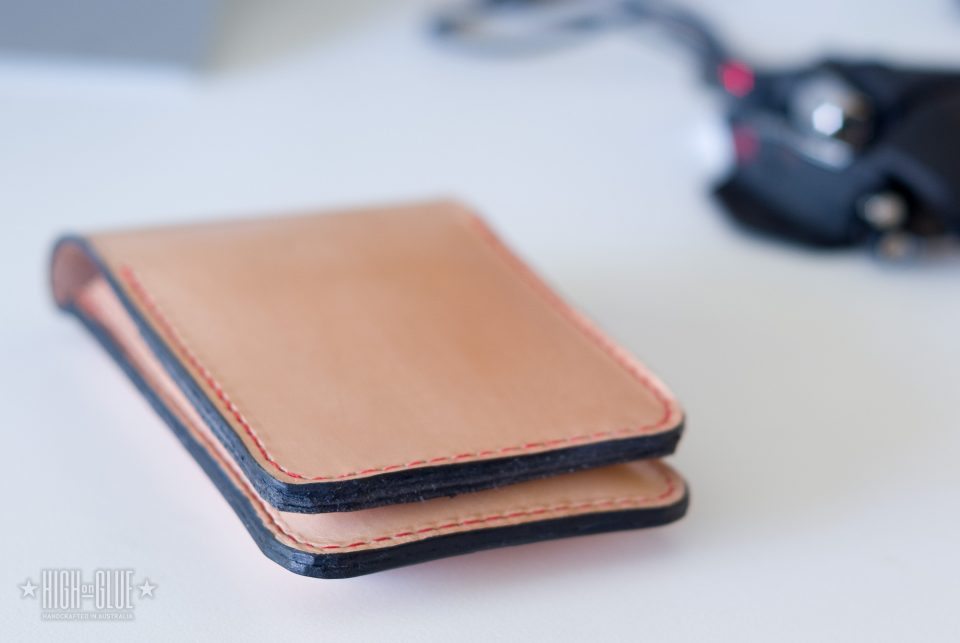
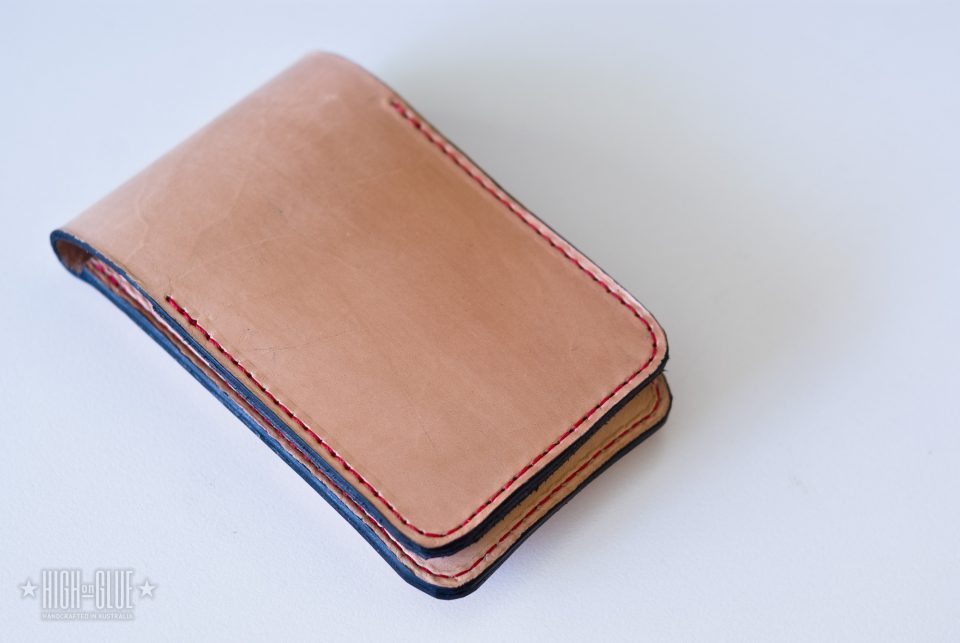
Finished Flip Wallet
Finished wallet: closed.
Finished Flip Wallet
Red stitching, natural veg-tanned leather and black edges.
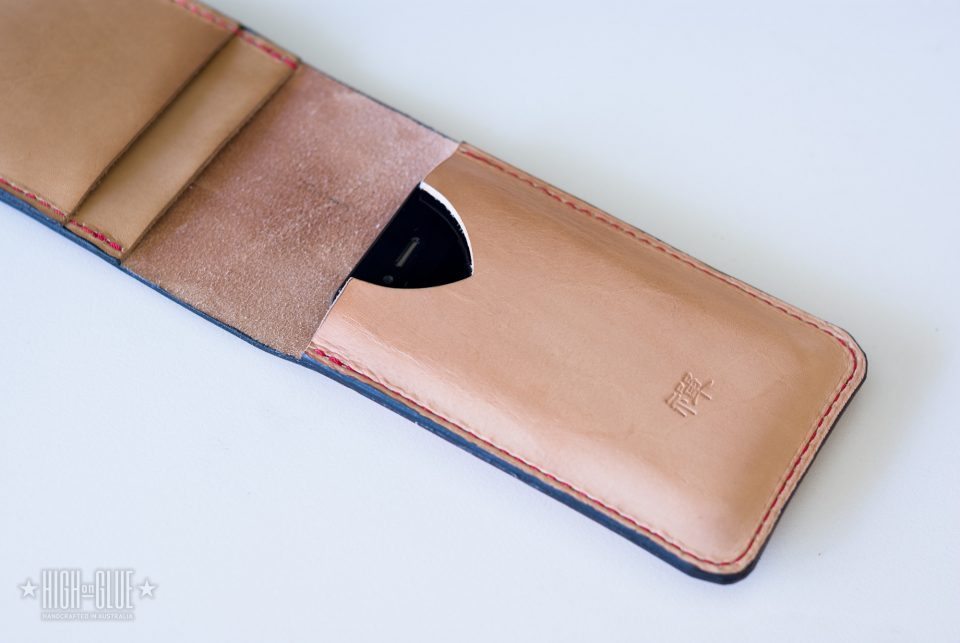
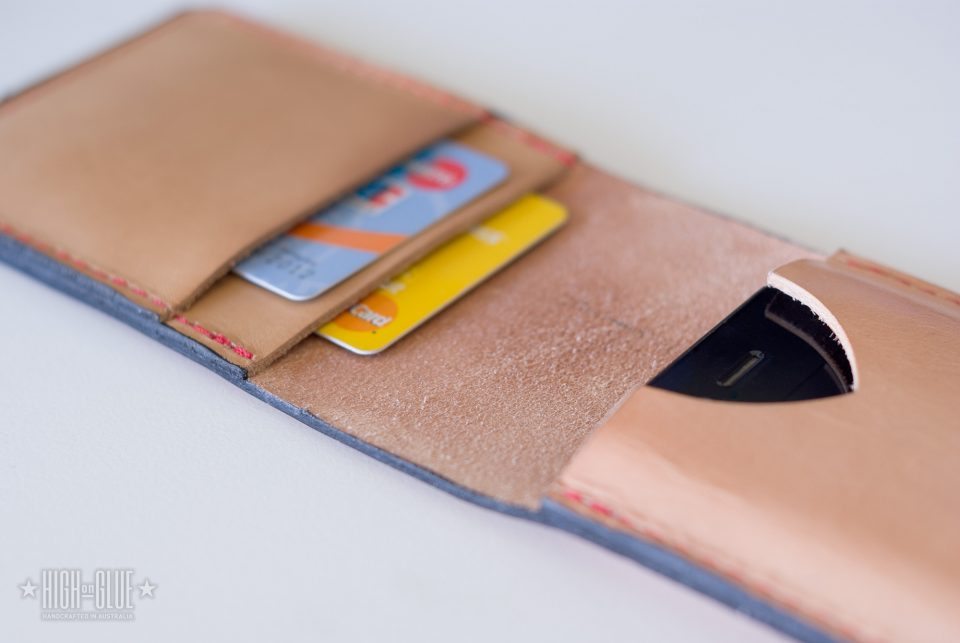
Finished Flip Wallet
The inside of the wallet
Finished Flip Wallet
Inside: close-up
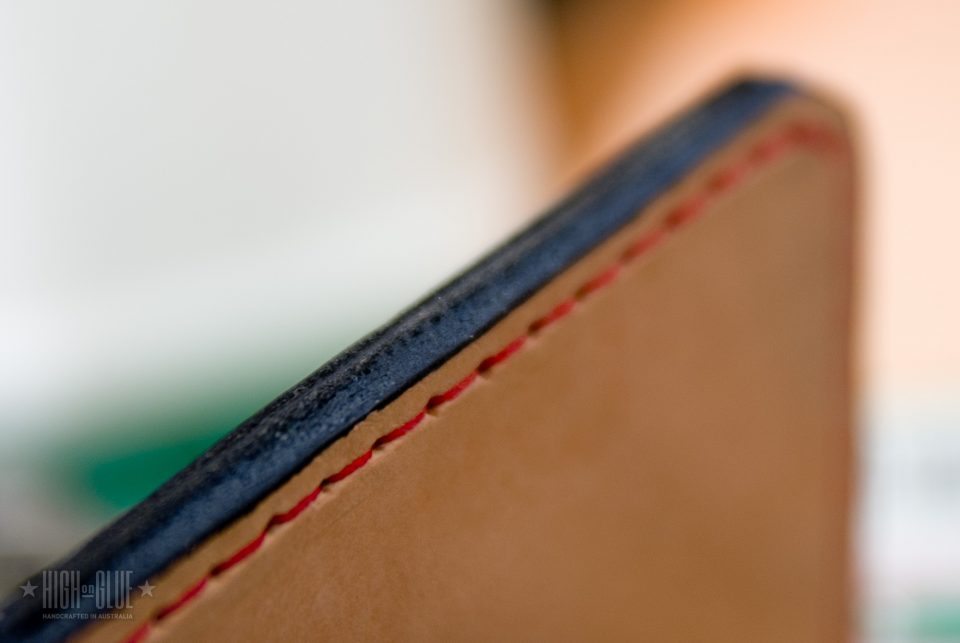
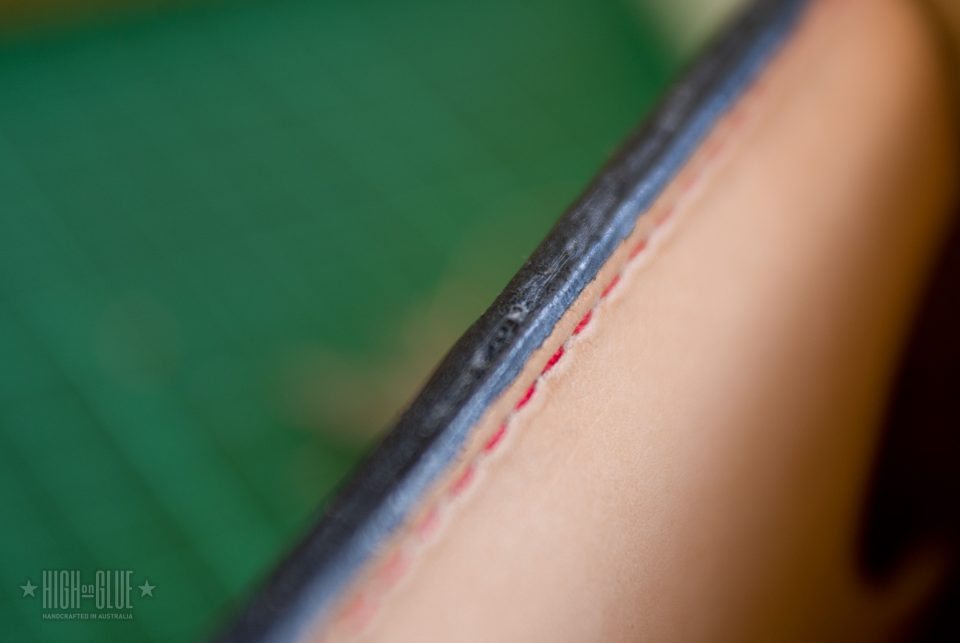
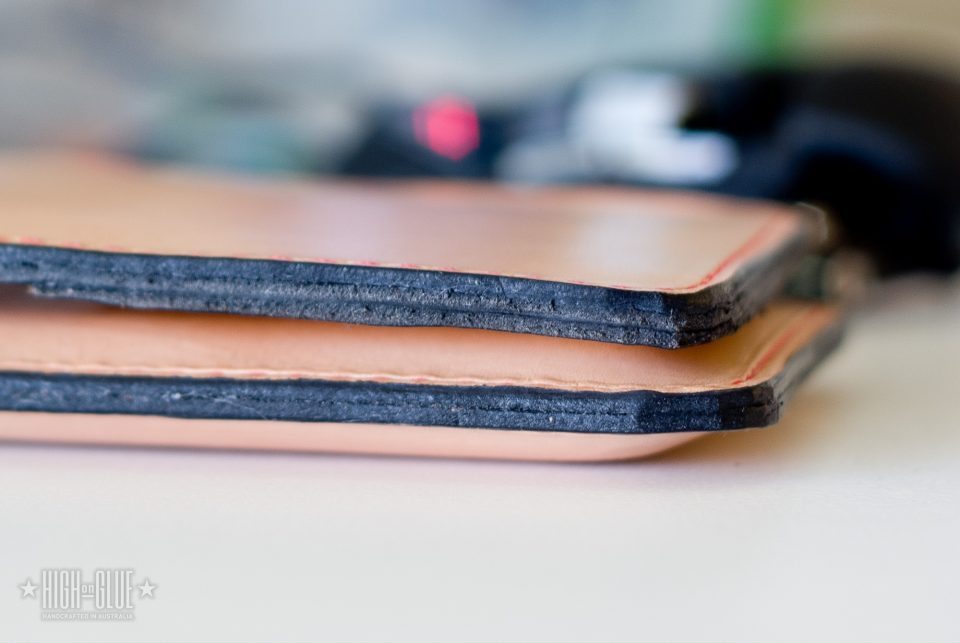
Finished Flip Wallet
edges
Finished Flip Wallet
stitching and hand-cut corners
Hope this post will help some of you to make one of these wallets. If you tried it, please let me know in the comments! If you want to show off your work, feel free to add a link to a photo, too.
Related
53 thoughts on “Leatherwork Tutorial: How to make a leather iPhone Flip Wallet”
Where do you buy your leather pieces at? It looks like you are starting with nice, clean-cut thick leather strips, and I haven’t been able to find them. Could you please share where you can purchase these sheets?
However, they usually don’t come in neatly cut strips.
To get the clean cuts you can use either a really sharp head knife (round knife) or to make it even easier, you could use a Craftool Strap Cutter and set it to the required width. Either way, you’ll have to cut the pieces yourself and even with the Strap Cutter you’ll need to at least have one straight edge to guide the cutter along.
I hope that helps. Let me know if you need more info
Yikes! Thats $171.46 without tax just for the tools. Not to mention the leather and any other additional tools you might need. I’m definitely interested in doing this because i’m sure i would try my hand at other things, but it seems like a hefty investment to get started.
Hey Brad,
Yes, that is a lot if you just want to make this and nothing else. But you could do this with less tools and leave out some of the steps if you just want to try to make this.
That’s why I posted another tutorial here where I used less tools and leather from an old bag. That can get you going before you start spending a lot of money on tools and materials….
At the end of the day, like most hobbies, it’s not easy to do it all for free unless you inherit the tools from relatives or friends
You can get leather off of eBay at very low cost, tools too. Also for starters tools check the local hobby stores and the Boy Scout store. The scouts do leather crafts. Should be one within driving distance or online. I make knife sheaths for the knives I make and I don’t have $50 worth of tools and they work fine. With a little farm sense you can make some of your own tools to fit your needs.
BRAD yes it is, some money, but your friends will love what you make for yourself and before you know it you will be making things for every body and that will pay for all the tools you want . start with just what you can get by with and then add as you go. wont be long you will have a nice little business going.. most of the things you need to start you my have and don’t even no you have.. utility knife, ruler , pencil , a sharpened nail to make holes , hammer , needles ,thread .. that is about all and a plain .. there you go !
I was thinking after I commented earlier, and I definitely forgot to thank you for sharing! I’m sure it’s taken a lot of time and effort to make these things and acquire the tools and materials as well as the skill it takes to create things like this.
The quality of work here is actually very high given the kind of leather and the attention to detail like the stitching. Comparing to a company like Ettinger, buying the tools and materials almost seems worth it since you’ll be making something you’d be paying almost double for anyway. I guess it makes you appreciate it more too.
BTW- I think it would be cool to make some videos. I’m not sure if it’s your thing, but i’d really be interested to see your process. Thanks again!
Great tutorial! Love seeing others process, the only thing I would have done differently was sand the edges for a more uniform look instead of using the knife which leaves the edges a bit jagged. Otherwise great product.
You can use regular PVA glue or pretty much anything that will hold the pieces together for long enough. There are plenty of craft glues that can be used for leather, too.
Hi! Love the tutorial! I have been looking for something that has finishing edges like this!
I was wondering though, do you think this edging technique would possibly work on vinyl?
Thanks Katy,
I haven’t tried it with vinyl so I don’t know. The way it works with leather is that the heat is creating the smoother edge. So I assume that it would work but it would depend on whether you can get enough heat into the vinyl…
This is so awesome! I’m very, very interested in leatherwork and couldn’t have asked for a better resource of information to start! Thanks so much for such a comprehensive and concise guide!
Name’s Eva and writing from Uganda. I recently enrolled for a course in leather work at a local university back here, but I can’t find good tools on the local market. I see you have some pretty neat knives and stuff you’re using, and I’d like to know if they come as a kit, and if so, what else does the kit contain, where can it be got and at how much?
Pse send your recommendations- am majoring in bag-making.
Hi Eva,
I haven’t tried any of the kits, I got each tool as I needed it. Most of the tools I got from local leatherwork supply places here in Australia and some from Japan:
I don’t know what’s available in Uganda but some online stores do ship internationally. http://tandyleatherfactory.com is a good place to start if you want to see what’s available. They have Starter Sets that include most things you will need.
You can check out the tutorials on this site for the things I use. I try to always add a list of tools for each project.
However, shipping costs might be too high to get these things sent to you from overseas. I would recommend that you check with your University to see if they know a local supplier (and maybe have student discounts?).
Tandy leather has branches in the USA, Canada in mostly large cities, but shipping to Uganda is too much from both countries. US shipping still min 25$ for small stuffs to 70$ for 6ibs, Shipping from Canada is the highest, when it is more than 250gmm. They have branches in or dealers to Australia(high shipping cost too), in UK(probably less shipping, but price higher than US and Canada and also has dealer in spain too. check it from http://www.tandyleatherfactory.com/en-usd/home/locations/storesearch.aspx
as he said goods japan has high quality Japanese mostly, but from IVAN taiwan too. Goods Japan has ebay store too. http://stores.ebay.ca/GoodsJapan-jp
I live not far from Tandy leather store in Canada and buy mostly from there, but bought some stuffs from goods japan and other companies.
I do different hobby works and leather craft of them to pass time.
Great job. I’ve just got into leather working. I love it. Made a few wallet kits, but want to make a good wallet from scratch. Where would I get patterns for it. Wish you had a tutorial on making a mans wallet.
Thanks Charles. You could just cut the straight pieces with the measurements I put at the beginning of this post and add the rounded corners once you have cut the strips of leather. Should be easy without a pattern. I’ll see if I have time to make a pattern file and upload it in the coming days.
Check back again in a few days
Thank you for the great tutorial.
What keeps the cards in the deeper, rear pocket from sliding down below the lip? Is there stitching midway down (card length)? Nice wallet but I wouldn’t want my cards to slide to the bottom of the pocket making them difficult to remove.
Hi Jake,
there’s no stitching to keep the back cards from sliding all the way down but the tension of the stack of cards keeps them where you put them. So as long as you don’t slide them all the way down, they’ll stay where they are.
I usually just put rarely used cards in the back and slide them out of the way and only have the 2-3 cards I use most in the front pocket.
You could add stitching, too. But if you do, make sure that the thread isn’t too thick, otherwise your front pocket will have a little “bump” where the cards have to slide past. You could also add a stitching groove to prevent that from happening (by lowering the thread into the leather).
Nice Work. Large skiving machines are very expensive, but you could use a hand-held skiving tool to thin the leather a bit, maybe 1mm thinner. This would allow the leather to be more supple and less stiff, which would allow for easier utilization of the pockets. One problem with thick and stiff credit card pockets is that there is a risk of the cards cracking under pressure. When using a hand-held skiving tool, the resulting surface will not be perfectly smooth, a problem that can be mitigated with a quick sanding.
Also, anyone who wants to try this project, without investing in a whole side of leather, could easily buy suitable scrap leather from a local leather worker. If you are in the US, you could contact someone on the http://www.leatherworker.net forum, though the forum is international.
Thanks for the comment, Edward. Great information! I haven’t tried sanding after hand-skiving, yet. Will do that before spending a few hundred on a bigger skiving tool.
I haven’t had an issue with my cards breaking/cracking but that might be a problem for some people.
Hi, Im interested in getting started and love your tutorial. One thing is not clear to me. Your sewing looks perfect. Is it a machine? If by hand do you have to punch holes first?
You can pre-punch the holes with a stitching chisel if you don’t want to use an awl. Those things can be found in leathercraft stores like http://www.tandyleatherfactory.com or even on amazon.
Doing the stitching by hand has a few advantages… It looks nice and it will last longer
With a little burnishing you’d have an extremely professional looking product!! I’ve found it’s always the little finishing details that let down the final product… Give it a go, you’ll be amazed at the difference! 🙂
Thanks Jaye! What do you recommend for burnishing? Plain water? Saddle soap? Beeswax? Something else?
I haven’t tried all of them yet and I haven’t found my favourite way of burnishing either. My results have been a bit inconsistent
I use a home made mixture of 50% beeswax and Neatsfoot Oil. You can get neatsfoot oil from Tandy or any place that sells horse supplies. I get mine from a farm supply store for $4.00 US a pint.
Just melt the beeswax and add the neatsfoot oil while the wax is still warm.
I store the mixture in an old cat food tin.
Great finished product! The only thing I had a question about is how you got the leather moulded to fit the iphone case. Did you wet the leather and use a bone folder, or just your fingers to get it to keep shape? Or was there another technique used?
Thanks Zayne, I didn’t really mould it to the phone. I just pushed it into shape. You could add a little moisture so that it keeps its shape when the phone is not inside the case. That’s personal preference. If you decide to wet mould it, you might want to make sure that you don’t add moisture in the part that folds over. You don’t want that part to get too stiff.
You could also wet-mould only the top part before sewing the wallet together. Almost a mix of something like this: https://highonglue.com/more-photos-of-the-4iphone4-leather-case/ and the flip wallet.
Hi Ruth, it doesn’t have to be, but vegetable tanned leather has a nice stiffness to it and it ages really nicely. You could make this with a softer leather but when you fold that open, it’ll flop around much more (sideways and in all sorts of directions). The stiffer veg-tan makes that a straight flip-open motion
Hi Atilla.. I am a beginner to leather craft and I find that the 3mm veg tan leather is to thick and stiff to fold. I wonder if is there some stuff to make it a little bit smoother. Or what an ideal thickness of the veg tan for mobile phone pouch and wallet?
I find 3mm a bit thick sometimes. I’d recommend you try and get the thinnest veg tan you can find. Around 1.2-1.6mm works well. If you can find it, kangaroo leather is another good option
Great tutorial! Would lambskin leather work as well as the veg-tan? I just got some itailan lambskin leather and was wondering if I could make the case out of it.
Hello! Me again (: I would like to pay for the pattern I would like to download, but I don’t usually use paypal and honestly find it a little confusing. Is there any other way?
That’s very kind, thank you! One other way would be if you’re using Amazon.com you could bookmark the link below and click on that before you order anything from Amazon. It won’t cost you extra but it’ll add a small percentage to my gift card balance 🙂 ( http://www.amazon.com/?_encoding=UTF8&camp=1789&creative=9325&linkCode=ur2&tag=attilaacs-20 )
Thanks again!!!
Hello! So I got your pattern for the Leather iPhone flip wallet. But I have problems with printing it in the right size. But I would be able to make the right size if you answer this question: If I place my iPhone in the middle of the pattern, where it should be, how many centimeters is there from the “edge” of the iphone to the edge of the pattern? Ps. Sorry for the tricky way of explaining but I hope you understand^^”
the actual dimensions of the pieces are here:
The large outside piece: 285mm by 87mm
The inside piece that holds the phone: 130mm by 87mm
The two credit card slots made from thinner leather: 97mm by 87mm and 77mm by 87mm
The iPhone 4 and 4S dimensions are:
115.2 mm x 58.6 mm x 9.3 mm
So that leaves 0.75cm left and right and about 0.72 top and bottom (plus extra for the area that folds in the middle). Hope that helps, but I’d use the dimensions above as a starting point if you want to adapt it for a different phone for example.
Hi Attila, this is a very nice tutorial! Thank you!
I have just got a question, I wonder how do you determine how many space you leave on the side from the edge of the phone to the edge of the leather and the extra space for the middle folding area? Cause I want to make a similar phone wallet but it’s not an iPhone 4, wonder how should I adjust the dimension for different phone. Thank you again!
Thanks for the comment! The space I leave is a bit of trial and error and depends on the thickness of the phone as well. With this one, I made a few versions before settling on the width. Most newer phones will be much wider so it doesn’t happen to match the width of a credit card anymore. Here’s a version I made for the iPhone 6 (the smaller one): https://highonglue.com/iphone-6-flip-wallet-prototype-i/
The middle folding area can be a pretty big range and still work well. Just make sure you leave around 0.5-1cm at least so it’s not too tightly wrapped around the top of the phone.
Hope that helps a bit. Sorry I can’t be more specific. It was mainly trial & error
Hi Attila,
Thank your for the pattern download, When I get paid I am going to order some leather and make a case for my new phone, it is not a Iphone but I printed out the first page at 85% of size from the pdf and my phone fits very nicely on that print out. When I get it finished I will send a photo of it.

Where do you buy your leather pieces at? It looks like you are starting with nice, clean-cut thick leather strips, and I haven’t been able to find them. Could you please share where you can purchase these sheets?
Hi John,
You can get vegetable tanned tooling leather from places like http://www.tandyleatherfactory.com
However, they usually don’t come in neatly cut strips.
To get the clean cuts you can use either a really sharp head knife (round knife) or to make it even easier, you could use a Craftool Strap Cutter and set it to the required width. Either way, you’ll have to cut the pieces yourself and even with the Strap Cutter you’ll need to at least have one straight edge to guide the cutter along.
I hope that helps. Let me know if you need more info
Another place to get a bunch of different leather hides is ORTU http://www.ortuleather.com/ (they’re out of LA).
Gorgeous!
Yikes! Thats $171.46 without tax just for the tools. Not to mention the leather and any other additional tools you might need. I’m definitely interested in doing this because i’m sure i would try my hand at other things, but it seems like a hefty investment to get started.
Kind of a bummer ):
Hey Brad,
Yes, that is a lot if you just want to make this and nothing else. But you could do this with less tools and leave out some of the steps if you just want to try to make this.
That’s why I posted another tutorial here where I used less tools and leather from an old bag. That can get you going before you start spending a lot of money on tools and materials….
At the end of the day, like most hobbies, it’s not easy to do it all for free unless you inherit the tools from relatives or friends
You can get leather off of eBay at very low cost, tools too. Also for starters tools check the local hobby stores and the Boy Scout store. The scouts do leather crafts. Should be one within driving distance or online. I make knife sheaths for the knives I make and I don’t have $50 worth of tools and they work fine. With a little farm sense you can make some of your own tools to fit your needs.
BRAD yes it is, some money, but your friends will love what you make for yourself and before you know it you will be making things for every body and that will pay for all the tools you want . start with just what you can get by with and then add as you go. wont be long you will have a nice little business going.. most of the things you need to start you my have and don’t even no you have.. utility knife, ruler , pencil , a sharpened nail to make holes , hammer , needles ,thread .. that is about all and a plain .. there you go !
I was thinking after I commented earlier, and I definitely forgot to thank you for sharing! I’m sure it’s taken a lot of time and effort to make these things and acquire the tools and materials as well as the skill it takes to create things like this.
The quality of work here is actually very high given the kind of leather and the attention to detail like the stitching. Comparing to a company like Ettinger, buying the tools and materials almost seems worth it since you’ll be making something you’d be paying almost double for anyway. I guess it makes you appreciate it more too.
BTW- I think it would be cool to make some videos. I’m not sure if it’s your thing, but i’d really be interested to see your process. Thanks again!
Great tutorial! Love seeing others process, the only thing I would have done differently was sand the edges for a more uniform look instead of using the knife which leaves the edges a bit jagged. Otherwise great product.
Thanks Quenten. Yes, that’s a good idea!
Hey, what glue do you use to stick the leather together before you go ahead and stitch?
Is it just a regular PVA or a specific leather glue
Thank You
You can use regular PVA glue or pretty much anything that will hold the pieces together for long enough. There are plenty of craft glues that can be used for leather, too.
Hi! Love the tutorial! I have been looking for something that has finishing edges like this!
I was wondering though, do you think this edging technique would possibly work on vinyl?
Thanks Katy,
I haven’t tried it with vinyl so I don’t know. The way it works with leather is that the heat is creating the smoother edge. So I assume that it would work but it would depend on whether you can get enough heat into the vinyl…
This is so awesome! I’m very, very interested in leatherwork and couldn’t have asked for a better resource of information to start! Thanks so much for such a comprehensive and concise guide!
Hi,
Name’s Eva and writing from Uganda. I recently enrolled for a course in leather work at a local university back here, but I can’t find good tools on the local market. I see you have some pretty neat knives and stuff you’re using, and I’d like to know if they come as a kit, and if so, what else does the kit contain, where can it be got and at how much?
Pse send your recommendations- am majoring in bag-making.
Thx
Hi Eva,

I haven’t tried any of the kits, I got each tool as I needed it. Most of the tools I got from local leatherwork supply places here in Australia and some from Japan:
I don’t know what’s available in Uganda but some online stores do ship internationally. http://tandyleatherfactory.com is a good place to start if you want to see what’s available. They have Starter Sets that include most things you will need.
You can check out the tutorials on this site for the things I use. I try to always add a list of tools for each project.
However, shipping costs might be too high to get these things sent to you from overseas. I would recommend that you check with your University to see if they know a local supplier (and maybe have student discounts?).
Good luck with your course!
Tandy leather has branches in the USA, Canada in mostly large cities, but shipping to Uganda is too much from both countries. US shipping still min 25$ for small stuffs to 70$ for 6ibs, Shipping from Canada is the highest, when it is more than 250gmm. They have branches in or dealers to Australia(high shipping cost too), in UK(probably less shipping, but price higher than US and Canada and also has dealer in spain too. check it from http://www.tandyleatherfactory.com/en-usd/home/locations/storesearch.aspx
BTW, Tandy leather import most of the stuffs from Taiwan. some from China, India, Japan etc http://www.ivan.tw/Default.aspx
as he said goods japan has high quality Japanese mostly, but from IVAN taiwan too. Goods Japan has ebay store too. http://stores.ebay.ca/GoodsJapan-jp
I live not far from Tandy leather store in Canada and buy mostly from there, but bought some stuffs from goods japan and other companies.
I do different hobby works and leather craft of them to pass time.
Great job. I’ve just got into leather working. I love it. Made a few wallet kits, but want to make a good wallet from scratch. Where would I get patterns for it. Wish you had a tutorial on making a mans wallet.
Thanks Charles. You could just cut the straight pieces with the measurements I put at the beginning of this post and add the rounded corners once you have cut the strips of leather. Should be easy without a pattern. I’ll see if I have time to make a pattern file and upload it in the coming days.
Check back again in a few days
UPDATE: here’s the pattern as a pdf
Thank you for the great tutorial.
What keeps the cards in the deeper, rear pocket from sliding down below the lip? Is there stitching midway down (card length)? Nice wallet but I wouldn’t want my cards to slide to the bottom of the pocket making them difficult to remove.
Hi Jake,
there’s no stitching to keep the back cards from sliding all the way down but the tension of the stack of cards keeps them where you put them. So as long as you don’t slide them all the way down, they’ll stay where they are.
I usually just put rarely used cards in the back and slide them out of the way and only have the 2-3 cards I use most in the front pocket.
You could add stitching, too. But if you do, make sure that the thread isn’t too thick, otherwise your front pocket will have a little “bump” where the cards have to slide past. You could also add a stitching groove to prevent that from happening (by lowering the thread into the leather).
Nice Work. Large skiving machines are very expensive, but you could use a hand-held skiving tool to thin the leather a bit, maybe 1mm thinner. This would allow the leather to be more supple and less stiff, which would allow for easier utilization of the pockets. One problem with thick and stiff credit card pockets is that there is a risk of the cards cracking under pressure. When using a hand-held skiving tool, the resulting surface will not be perfectly smooth, a problem that can be mitigated with a quick sanding.
Also, anyone who wants to try this project, without investing in a whole side of leather, could easily buy suitable scrap leather from a local leather worker. If you are in the US, you could contact someone on the http://www.leatherworker.net forum, though the forum is international.
Thanks for the comment, Edward. Great information! I haven’t tried sanding after hand-skiving, yet. Will do that before spending a few hundred on a bigger skiving tool.
I haven’t had an issue with my cards breaking/cracking but that might be a problem for some people.
Thanks again
Attila
Great tutorial! Thanks for sharing 🙂
Hi, Im interested in getting started and love your tutorial. One thing is not clear to me. Your sewing looks perfect. Is it a machine? If by hand do you have to punch holes first?
Ferb
Hey Ferb,
thanks! The sewing is done by hand. I put together a guide that shows you how to get the sewing done:
https://highonglue.com/how-to-hand-sew-thick-leather/
You can pre-punch the holes with a stitching chisel if you don’t want to use an awl. Those things can be found in leathercraft stores like http://www.tandyleatherfactory.com or even on amazon.
Doing the stitching by hand has a few advantages… It looks nice and it will last longer
With a little burnishing you’d have an extremely professional looking product!! I’ve found it’s always the little finishing details that let down the final product… Give it a go, you’ll be amazed at the difference! 🙂
Thanks Jaye! What do you recommend for burnishing? Plain water? Saddle soap? Beeswax? Something else?
I haven’t tried all of them yet and I haven’t found my favourite way of burnishing either. My results have been a bit inconsistent
I use a home made mixture of 50% beeswax and Neatsfoot Oil. You can get neatsfoot oil from Tandy or any place that sells horse supplies. I get mine from a farm supply store for $4.00 US a pint.
Just melt the beeswax and add the neatsfoot oil while the wax is still warm.
I store the mixture in an old cat food tin.
Great finished product! The only thing I had a question about is how you got the leather moulded to fit the iphone case. Did you wet the leather and use a bone folder, or just your fingers to get it to keep shape? Or was there another technique used?
Thanks Zayne, I didn’t really mould it to the phone. I just pushed it into shape. You could add a little moisture so that it keeps its shape when the phone is not inside the case. That’s personal preference. If you decide to wet mould it, you might want to make sure that you don’t add moisture in the part that folds over. You don’t want that part to get too stiff.
You could also wet-mould only the top part before sewing the wallet together. Almost a mix of something like this: https://highonglue.com/more-photos-of-the-4iphone4-leather-case/ and the flip wallet.
Does it have to be vegetable leather?
Hi Ruth, it doesn’t have to be, but vegetable tanned leather has a nice stiffness to it and it ages really nicely. You could make this with a softer leather but when you fold that open, it’ll flop around much more (sideways and in all sorts of directions). The stiffer veg-tan makes that a straight flip-open motion
Please help me with making my own custom stamp
Hey Dan, check out http://www.tuffcase.com/shop/ for affordable custom stamps
Hi Atilla.. I am a beginner to leather craft and I find that the 3mm veg tan leather is to thick and stiff to fold. I wonder if is there some stuff to make it a little bit smoother. Or what an ideal thickness of the veg tan for mobile phone pouch and wallet?
I find 3mm a bit thick sometimes. I’d recommend you try and get the thinnest veg tan you can find. Around 1.2-1.6mm works well. If you can find it, kangaroo leather is another good option
Thank you so much for taking the time to put this template together for us!!!!
You are awesome!!!!!
Great tutorial! Would lambskin leather work as well as the veg-tan? I just got some itailan lambskin leather and was wondering if I could make the case out of it.
As long as it’s stiff enough to make sliding the phone in and out easy enough, it should work with all kinds of leathers.
Hello! Me again (: I would like to pay for the pattern I would like to download, but I don’t usually use paypal and honestly find it a little confusing. Is there any other way?
Between, I tried to get the pattern for free, but nothing showed up in my inbox on my email…
Hey Mette, I have just sent you an email with the files. Hope that helps!
Thank you very much! But I still wanted to make a little donation or pay for your work.. Is there any other way than Paypal?
That’s very kind, thank you! One other way would be if you’re using Amazon.com you could bookmark the link below and click on that before you order anything from Amazon. It won’t cost you extra but it’ll add a small percentage to my gift card balance 🙂 ( http://www.amazon.com/?_encoding=UTF8&camp=1789&creative=9325&linkCode=ur2&tag=attilaacs-20 )
Thanks again!!!
Hello! So I got your pattern for the Leather iPhone flip wallet. But I have problems with printing it in the right size. But I would be able to make the right size if you answer this question: If I place my iPhone in the middle of the pattern, where it should be, how many centimeters is there from the “edge” of the iphone to the edge of the pattern? Ps. Sorry for the tricky way of explaining but I hope you understand^^”
Hi Mette,
the actual dimensions of the pieces are here:
The large outside piece: 285mm by 87mm
The inside piece that holds the phone: 130mm by 87mm
The two credit card slots made from thinner leather: 97mm by 87mm and 77mm by 87mm
The iPhone 4 and 4S dimensions are:
115.2 mm x 58.6 mm x 9.3 mm
So that leaves 0.75cm left and right and about 0.72 top and bottom (plus extra for the area that folds in the middle). Hope that helps, but I’d use the dimensions above as a starting point if you want to adapt it for a different phone for example.
Hi Attila, this is a very nice tutorial! Thank you!
I have just got a question, I wonder how do you determine how many space you leave on the side from the edge of the phone to the edge of the leather and the extra space for the middle folding area? Cause I want to make a similar phone wallet but it’s not an iPhone 4, wonder how should I adjust the dimension for different phone. Thank you again!
Hi Bowie,
Thanks for the comment! The space I leave is a bit of trial and error and depends on the thickness of the phone as well. With this one, I made a few versions before settling on the width. Most newer phones will be much wider so it doesn’t happen to match the width of a credit card anymore. Here’s a version I made for the iPhone 6 (the smaller one): https://highonglue.com/iphone-6-flip-wallet-prototype-i/
The middle folding area can be a pretty big range and still work well. Just make sure you leave around 0.5-1cm at least so it’s not too tightly wrapped around the top of the phone.
Hope that helps a bit. Sorry I can’t be more specific. It was mainly trial & error
love the work that you do! simple yet elegant. keep it going!
Hi Attila,
Thank your for the pattern download, When I get paid I am going to order some leather and make a case for my new phone, it is not a Iphone but I printed out the first page at 85% of size from the pdf and my phone fits very nicely on that print out. When I get it finished I will send a photo of it.